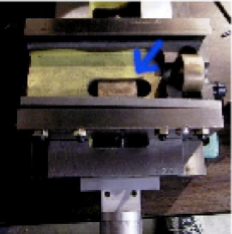
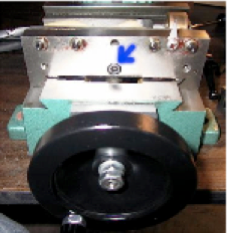
Z Feed Dial Indicator Bracket For the Mini Mill
This is a simple project, and makes the mill much nicer to use. There is a lot of sloop in the Z axis feed on the Grizzly Mini Mill. I looked at fixing it, but it is going to be lots of work. The back lash on my mill after I had adjusted everything was still over 1/4 of a turn of the fine feed knob. When I needed to move the head in precise amounts I used a super magnet and a dial indicator. This worked great, but was a pain to move it up and down the column as needed. What I needed was a simple mounting bracket for the dial indicator.
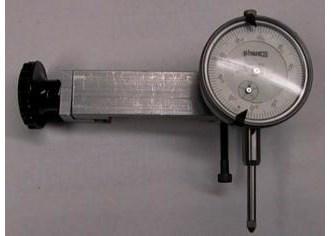 With the dial indicator mounted on the vertical column, you just need to move it zero it, and you are all set. This works so well, I have ordered a 2 inch dial indicator, and am probably going to forget about re-building the Z Feed all together. Being new to milling, it did not turn out as nice as I would have liked, but it does its job just fine. I will re-build it some day, but it is 100% functional the way it is. I started with a 1 inch piece of aluminum, cut to the width of the column. I milled out the center to clear the center rack. There is also a hex head cap screw on the left of the upper column with a rubber washer on it. It is there to keep you from raising the column too high. You will have to allow for this also. I simply left mine off, which gives me about 1 inch more of head travel. I am going to replace it with something closer to the top of the mill. Most likely a 10-32 cap screw, and a washer placed on the top surface of the column. You never know when that extra inch or so will come in handy.
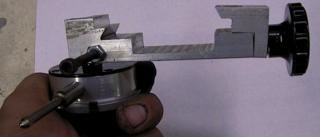 As I only had a 1/2 inch dove tail cutter on hand I cheated on my dove tails. They do not go the full face of the dove tail on the column, as you can see in the pictures. I guess I could have made 2 passes at it, but there was no need in this instance. The holder is tightened on the left side with a 1/4-20 plastic knob I picked up at the local Sears hardware store. To mount the dial indicator I milled out the top section on the right, You can not see this in the picture. I wanted the indicator point to rest on the milling head, and knot the Z feed worm gear housing. On the bottom of the holder I drilled and taped a 10-32 hole, and placed a cap head screw in it. This is to prevent damaging the dial indicator by raising the head of the mill up and bottoming out the dial indicator.
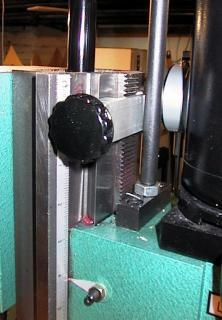
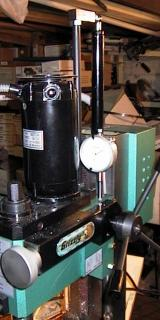 I have replaced the 1 inch dial indicator with a 2 inch, and it works very well. The extra inch of travel is much nicer. I have a digital caliper that I am planing on permanently mounting on the table, as my next project. Hope to have a report on how that went real soon.
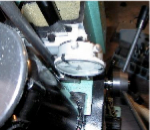
I was amazed at how stable the mill is when cutting. The dial indicator needle does not move at all when the machine is running , even when taking heavy cuts in aluminum with out the Z feed locked down.
Dale Wentz (2-1-2000)
First Day With The Mini Mill
I ordered the Mini Mill via Grizzly Industrial on 1-12-2000. I received a shipping confirmation e-mail from Grizzly and a call from the shipping company on 1-17-2000. I had the Mini Mill shipped to my office address, where I would have help unloading it off of the truck. When the truck arrived I pulled my Mazda pickup to the back of the 18 wheeler. Myself along with 3 other able bodied people picked it up and moved it to the bed of my truck. With this many people it was no effort at all. I covered it with a garbage bag and strapped it down. After getting home I backed my truck up to the back porch with the tail gate down. There is about 1 inch difference in height between the concrete flow and the bed of my truck. With the help of my wife I walked it off the truck and onto the back porch. To get it in the house I had 2 steps to go up. I decided to lift it up the stairs. I picked it up and set it up the 2 steps. Then walked it into the kitchen, where I had more light to work, and it was warmer.
My son Kyle 11 got a pry bar and opened the top of the box for me. Interestingly the inside of the box was lined with some kind of plastic sheeting. It was white with red and blue stripes. My 6 year old girl Torri said, that was to the Chinese knew that this machine was going to be shipped to the US. 🙂 I had told her earlier that it came all the way from China. I don’t think she believed me! We then disassembled the rest of the crate, and disposed of the wood to the burn pile. The wood had a very potent smell, smells like insecticide to me. So I wanted to get it out of the house as soon as possible. The Mini Mill was bolted to the bottom of the crate with 2 metric hex head bolts and nuts. These bolts fit the T-nuts that come with the mill so do not pitch them. We unbolted the Mill, and with the help of Kyle, lifted it off onto a paper grocery bag as to not get grease on the kitchen floor. My wife said that it did not look like $600.00 worth a machine sitting there. You know how wife’s are with tools.
I wiped as much of the red grease off as I could with paper towels. Now all I needed to do was get the thing into the shop in the basement. It is way to heavy for me to carry it down the steps. I should have used the 2 wheel cart and moved it down before we uncrated it. I looked in the manual, and decided to take the vertical column off and move it in 2 pieces. I sent Kyle down stairs to open all the doors and make sure we had room to set it on the work bench. This still made for 2 heavy but movable pieces. The column is held on with one BIG nut on the back. Kyle helped me slide the column off and get it into a position so I could carry it. It was heavier that I had thought but down the steps I went. We placed it on the work bench, and went up to get the base, and all the other pieces. Kyle helped me get the column back on, He guided it while I lifted it into place, and tightened the nut. It was not square, but I could fix that later.
First thing to do was get the dial indicator out and see how good this thing was put together. I set the vertical column back so that it was close to square with the table. I just aligned it up with the markings on the base. I put the dial indicator on the outside of the spindle and turned it by hand. The indicator did not move at all (.001 Phase II indicator). I checked to make sure it was making contact, it was. Got out the other indicator ($10.00 Harbor Freight) and it was the same way. So far so good. I put the drill chuck in and chucked the indicator in it. Put the point on the table and ran it from one end to the other. The dial indicator jumped around a lot when I turned either hand crank. Something was very loose. I moved the indicator to the base, and put the plunger on the front of the X feed base. Hit it with my hand from the side, the needle jumped but came back to where it was. I then checked the front to back movement. I hit the table, and the needle moved 1/2 way around the indicator. I grabbed the table and could shook it back and forth. There was a lot of play in it. Well it was time to tear into the machine and see what was going on. I removed both the rubber covers that keep the lead screws clean Then took the plate off the left side of the milling table and cranked it off the other end. Be warned the table is heavy. Once the table was removed, I thought I saw the problem. In the X feed the feed nut that the screw goes to was crocked to the side. I also noticed that there was a set screw just above the lead screw.
I could move the feed nut by hand, so I straitened it out and tightened the set screw. (Not this is not shown in the drawings that came with the mill) (See Figure 1) The nut now seemed to be tighter, so I tightened it a little more. Now I could not move the table. I loosened it up a little more until I could turn the hand wheel freely. I grabbed the carriage, and pushed and pulled on it. It still moved from front to back a bunch. I noticed a clicking sound as I moved the carriage. I also notice I had a lot of backlash in the handle. Could the handle be the problem? I grabbed the handle, and pulled on it. Nothing! Then I pushed on it, that was it. I removed the handle and looked at how it was put together, the handle is the only thing that holds the lead screw in. I cleaned it up, and put some Mobil 1 Synthetic grease on it, and reassembled it. I tightened the nut firmly, and tried to turn the hand wheel, it would not turn. I loosened the nut about 1/4 of a turn, and it now turned freely. I checked it with the dial indicator, and the needle moves less than .001. Now on to the Gibs. I loosened everything up. Cleaned off the old grease and replaced with Mobil 1. I tightened them up until I was satisfied with how it was running. I check with the dial indicator, and now just had a little bit of movement, maybe 1/5 of a graduation on the indicator! Backlash was also down to .001! Good enough for me for now.
Thoughts on changes to the X feed (At some later date):
- Add thrust bearing to the hand wheel.
- Secure the feed nut to the carriage.
- Change the gib wedges to brass.
Now on to the Y feed:
I cleaned everything up and greased with Mobil 1. I put the table back on the carriage and centered it. First thing to do was to remove the handle and check that out. It need a little persuading with a soft head hammer to get the handle off. I cleaned and reassembled with Mobil 1. Then tightened as I did above and checked it with a dial indicator. No noticeable movement at all when I hit it with my hand. Backlash is also under .001. Good enough.
Thoughts on changes to the Y feed:
- Add trust bearing to the hand wheel.
- Change the gib wedges to brass.
Now the Z feed:
Wow, the backlash on the fine feed is over 1/2 a revolution of the wheel. I had read about others having the same problem. I took the linkage cover off on the right side. I turned the wheel, and the linkage did not move for over 1/4 turn of the fine adjustment knob. I took the knob off, noticing that the set screw was very loose. Cleaned, greased, and reassembled. Still more play that I like, but a little better. I cleaned the vertical column, and noticed there was lots of crud in the dovetails. I took a small tool and started to clean them out. This stuff looks like the dust under my grinder mixed in with a little oil.. Checked it with a magnet, and sure enough, it was steal. Took a while to get it all out. Final cleaning with Lacquer thinner got all of it out. I really should have taken the head off, and cleaned under the gib, but I think I got most of it. This stuff would play havoc on all the surfaces. I am still planing on taking it all apart for another cleaning and adjustment once I have played with it a little more. No play in the head when it was locked down, so I did not adjust the gibs.
Thoughts on changes to the Z feed:
- Will have to do something about the Z feed.
- There is just too much slop in it.
- Change the gib wedges to brass
First Cuts:
I mounted my small drill press vise to the table with the included T nuts. Squared the vise on the table, and put a small piece of aluminum in the vise. Installed the 3/8 end mill holder and installed a 1/4 inch 4 flute end mill. Lowered the head to take about a 1/8 inch by 1/8 inch cut off the side of the block. Turned on the machine for the first time, and nothing. I remembered reading that the speed control had to be at 0 before it would start. Finally got the thing running. Played with all the switches and such. What a mess. This will be something I will have to rework. I am not happy with the way this works at all. I would like to be able to set the speed and use the on/off switch to turn the thing on and off. Took a cut on the side of the aluminum, and it cut very effortlessly. Not like milling on my little Taig lathe at all. The cut looks good and clean. Took another cut this time about 1/4 in deep. Cuts great, but the finish was not the best. Locked the Gibs down except for the Y feed and took another cut. That cleaned everything up. The end mill is probably not as sharp as it should be either. Well its getting late, need to go spend some time with the wife. She said earlier in the week, that once I got this machine she would not see me for a while. Don’t want her to be able to say I told you so!
Final Thoughts:
This machine has great possibilities. I enjoy tweaking up my machines to suite my needs. I knew that I would have to make a few adjustments when it arrived. I have seen no show stoppers so far. The Z feed will take a little more work that I had expected. It is a heavy enough machine to do all the tasks that I have in mind. In one evening I have the machine in good enough shape that I can use it with no further improvements.
The fixing pin (Spindle Lock) does not have a interlocking switch. I have read of at least one person on the e-groups server http://www.egroups.com/list/7x10minilathe/info.html that turned his mill on with the fixing pin in place. Nasty things happen to the gears when this is done! I plan on drilling a small hole in the handle, and placing a 12 inch long brightly colored thin plastic steamer on it. This will ensure that I don’t make the same mistake. I also ordered the optional 3/8 inch end mill holder. This is well worth the extra 16.00, and I think I am going to order at least the 3/16, 1/2, and 3/4 inch ones to go with it. The mill came with 2 collet holders one for 3/8, and one for 1/2. But I am more comfortable with the end mill holders with a set screw. I still need to find a suitable vise. The Grizzly is a good possibility. I ordered Grizzly’s 3/8-16 hold down kit also. The T-Nuts do not fit the table, I am going to order some from Travers and a few other accessories also. I am very impressed with the build quality of the machine (With the exception of the Z axis feed). The castings are all very clean. All surfaces are well machined. In fact the only rough area I could find at all was at the bottom of the milling table, there is one spot on the front most channel that has a high spot on the very bottom of the table. The enclosed T-Nuts clear it, but I think I will clean it up anyway.
The self centering dials and handles are very nice, they are marked in .001 increments, but have a odd number of turns (Due to the metric feed screws) It goes to 125 instead of 100. I have not figured out why they are numbered they way they are either. The dials are marked, and are incremented by 10 for every 5 .001 divisions. so the 2 is relay .010, 4 is .020 etc. Is this normal on a mill??????? It will drive me nuts that for sure.
Would I recommend this machine to anyone? You bet. For the money you cant go wrong. It makes the Sherline Mill look like a toy. It is big enough to do what I want. With a little improvements and tweaking here and there it will make a fine machine. The MT#3 spindle makes it very versatile.
